View and Manage Project Dashboard
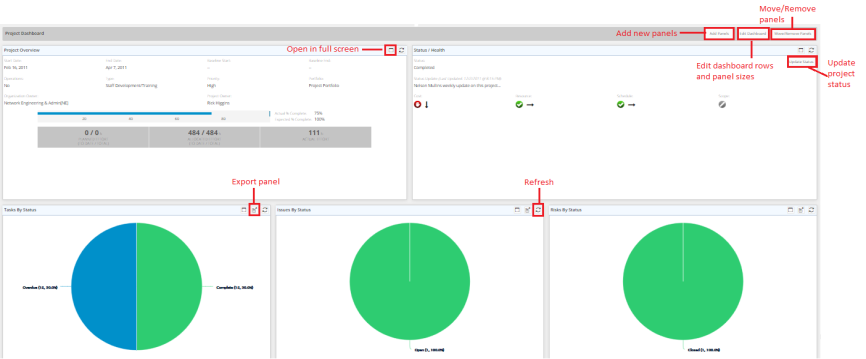
For close monitoring of each project, Eclipse users are offered a pre-configured dashboard which is generated automatically, to enable users to have a quick overview on the main data including the status of the overall project and the status of each task, issue and risk linked to the project. Users have full control over the panels of this dashboard.
For better usability of the project dashboard, users can easily update the status of the project from within the dashboard.
To view dashboard of a project
- At the upper-right corner of the project workspace, click Project Menu.
A drop-down menu is displayed.

- From the displayed menu, click Dashboards.
The Project Dashboard page opens.
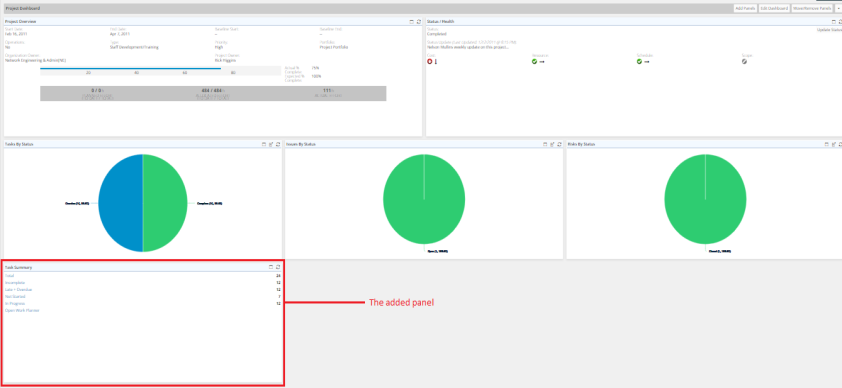
To add a panel to the Project Dashboard
- At the upper-right corner of the Project Dashboard page, click Add Panels.
The Add Panels dialog box is displayed.

- On the Add Panels dialog box, select the check box next to the panel(s) you want to include in the dashboard.
- Click the arrow under Insert New Panel(s), and then select whether you need the selected panels to appear at the bottom or at the top of the dashboard page.
- Click OK.
The selected panel appears blank on the dashboard page.
Note: The added panel(s) must be configured. The panels configuration options vary based on the type of panel (Chart or List) selected. For more information on configuring dashboard panels, please refer to the Configure Chart Panels article and the Configure List/Portfolio Summary Panels article under Dashboards > Manage Dashboard Panels.
To edit the project dashboard
- At the upper-right corner of the Project Dashboard page, click Edit Dashboard.
The Edit Custom Project Dashboard dialog box is displayed.

- From the Rows drop-down list, choose the number of rows needed.
Other drop-down lists appear as per the number of rows you have chosen (for example, Row 1, Row 2, and so on). - From each drop-down list, define the number of columns, as well as the size, of the relevant row.
- Click Save.
The changes made are applied autocratically to the dashboard.
To move a panel from one place to another
- At the upper-right corner of the Project Dashboard page, click Move/Remove Panels.
The panels are enabled for adjustment or removal.

- Click inside the panel you want to change its place, and start moving the panel, with your mouse, to the new position.
You will notice that the Drag and Drop cursor shape appears when you start moving the panel.
 - At the upper-right corner of the dashboard page, click OK.
The panel is displayed in the new position.
To remove a panel
- At the upper-right corner of the Project Dashboard page, click Move/Remove Panels.
The panels are enabled for adjustment or removal.

- At the upper-right corner of the panel you need to remove, click the x sign.
The panel is removed from the dashboard page. - At the upper-right corner of the dashboard page, click OK.
The dashboard page is displayed without the removed panel(s).
To open a panel in a full screen
- At the upper-right corner of any panel, click the Toggle Fullscreen icon
 .
.
To exit the full screen
- At the upper-right corner of the panel, click either the same Toggle Fullscreen icon or press the Esc key.
To export a chart panel
- At the upper-right corner of the chart panel, click the Export icon
 .
.
The Export Data dialog box is displayed.

- From the Format drop-down list, select the required file format.
- Click OK.
The exported file is downloaded automatically to your machine.
To refresh a panel and reflect any changes made
- At the upper-right corner of any panel, click the Refresh Panel icon
 .
.